Table of Contents
- "I'm unable to run the provided scripts due to my execution policy."
- "Why am I getting licensing errors when I try to run the deployment scripts?"
- "I'm receiving authentication failures and re-authentication warnings when running the deployment scripts."
- "Why am I getting 502 errors when trying to re-deploy this solution?"
- "What does the downloaded PowerShell script perform?"
PowerPlay - Provisioning & Deployment
 Updated
by Niamh Ferns
Updated
by Niamh Ferns
- "I'm unable to run the provided scripts due to my execution policy."
- "Why am I getting licensing errors when I try to run the deployment scripts?"
- "I'm receiving authentication failures and re-authentication warnings when running the deployment scripts."
- "Why am I getting 502 errors when trying to re-deploy this solution?"
- "What does the downloaded PowerShell script perform?"
Introduction
Deployment Steps
Estimated Time: 30 minutes
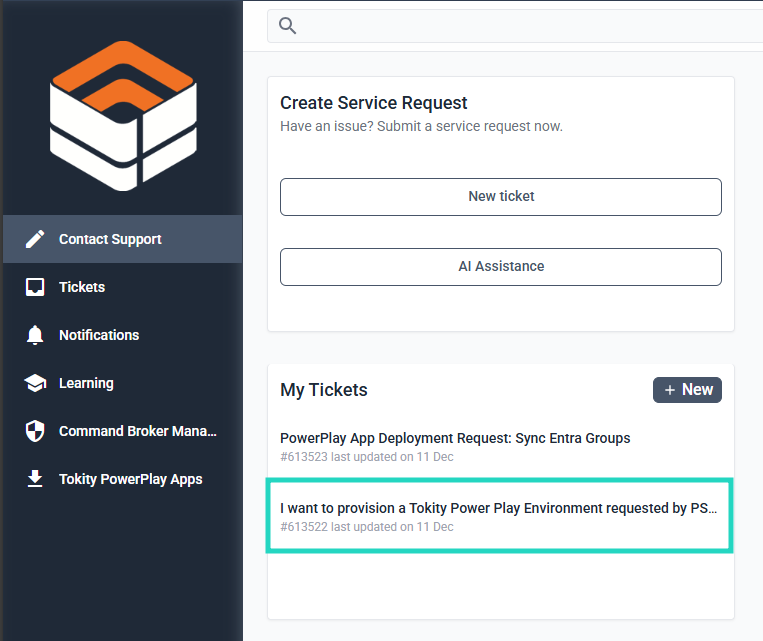
Initiate Provisioning Request
For the first part of the process, you'll need to log a ticket under the DeskDirector Support Portal.
- Under the
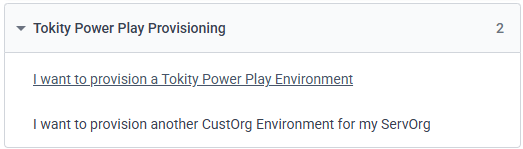
Contact Support>New Ticket - Log a new personal "I want to provision a Tokity Power Play Environment" ticket on the DeskDirector support portal.
- Fill in details for:
- Your DeskDirector URL:
https://<yoursubdomain>.deskdirector.com - A Master Admin's access token for your DiskDirector Instance: Admin Portal >
Advanced>Developer Corner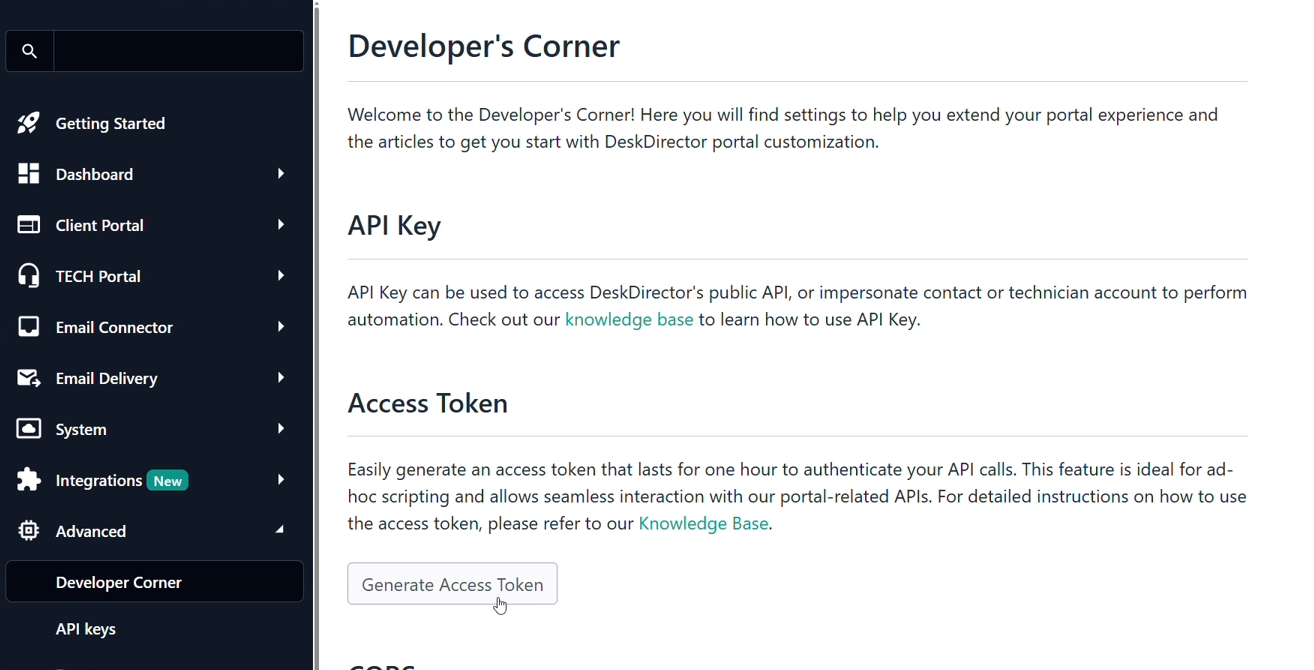
- The account/company under your DeskDirector instance you setting up as a CustOrg
- For your initial deployment, it is highly recommended that both the ServOrg and CustOrg are your internal company
- Whether you want this to be a Development or Production environment.
- The base name you would prefer for the environment.
- The ServOrg and CustOrg Power Platform Environments will follow this naming scheme:
<Your Base Name> Tokity ServOrgor<Your Base Name> Tokity CustOrg.
- The ServOrg and CustOrg Power Platform Environments will follow this naming scheme:
- Whether you have the required Onboarding Administrator permissions in your organisation.
- Your DeskDirector URL:
- After submitting the form, you will receive an automated response with the next steps to get everything deployed:
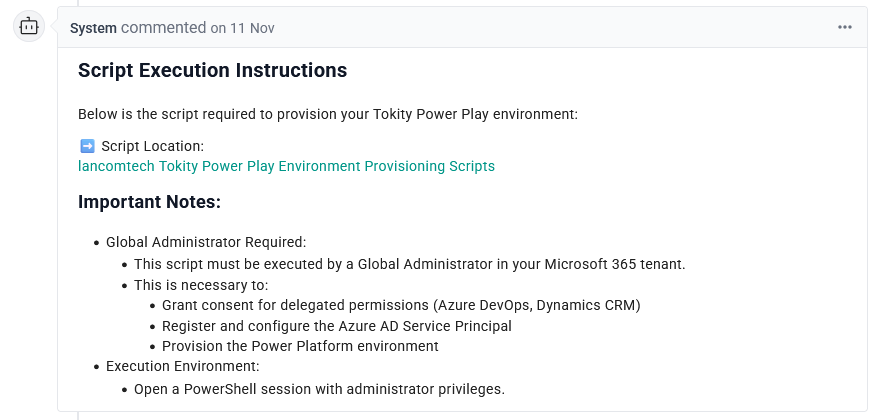
- Once you receive this response on your ticket, download the linked scripts to somewhere you can come back to later and continue to the next section:
<Your Base Name> Tokity ServOrg Power Play Environment Provisioning Script.ps1<Your Base Name> Tokity CustOrg Power Play Environment Provisioning Script.ps1<Your Base Name> Tokity Power Play Environment Teardown Script.ps1
We typically recommend downloading these scripts toC:\PowerPlayorC:\Users\<Your User>\PowerPlay. This article will assume you are usingC:\PowerPlayfor the script location.
ServOrg Deployment
If you have not yet done so, please return to the previous sections in this article and finish those first.
Provision a ServOrg Environment using PowerShell
- From your local machine in an administrator PowerShell prompt:
- Change directory to the location of the downloaded PowerShell scripts, if you are following the naming scheme advised, these will be under
C:\PowerPlaycd C:\PowerPlay
- Prepare the execution command with supporting parameters:
- IsTest set to $false
- EnvironmentType set to "Production"
& '.\<Your Base Name> Tokity ServOrg Power Play Environment Provisioning Script.ps1' -IsTest $false -EnvironmentType "Production"
- If you would like to perform a test deployment as a developer environment, you can set the
IsTestparameter to$trueand set theEnvironmentTypeparameter to"Developer"or"Sandbox".
- Execute the Tokity ServOrg Power Play Environment Provisioning Script:
PS C:\Windows\System32> cd C:\PowerPlay
PS C:\Windows\System32> Unblock-File -Path '.\<Your Base Name> Tokity ServOrg Power Play Environment Provisioning Script.ps1'
PS C:\Windows\System32> & '.\<Your Base Name> Tokity ServOrg Power Play Environment Provisioning Script.ps1' -IsTest $false -EnvironmentType "Production" - Use
Unblock-Fileas required if you receive error messages related to Execution PolicyYou may be prompted to re-authenticate here via SSO for Microsoft Graph. If so, please authenticate using the Onboarding Administrator from your tenant.
- Change directory to the location of the downloaded PowerShell scripts, if you are following the naming scheme advised, these will be under
- Follow the on-screen prompts for the script:
[STEP 1] Validating prerequisites...
The script will automatically check whether everything is ready to proceed, then move on to the next step.[STEP 2] Resetting PAC CLI authentication...
Any previously cached logins for MS Graph will be removed. Press enter, and you will be prompted to sign in with the admin account for the ServOrg's Microsoft 365 tenant.[STEP 3] Creating Power Platform environment '<basename> Tokity ServOrg'...
The script will automatically create the ServOrg Power Platform environment and then move on to the next step.[STEP 4] Retrieving environment ID...
It will confirm the environment is retrievable and grab the environment ID. You will be prompted to enterYto continue.[STEP 5] Authenticating to environment '<basename> Tokity ServOrg'...
The script will pause for 3 minutes while it waits for Dataverse to finish provisioning, after which, you will be prompted to sign in again with the admin account for the ServOrg's tenancy. Once this is done, you will be prompted to enterYto continue.Authentication may fail because Dataverse was unable to provision quickly. Don't worry, it will re-prompt you again after 2 minutes.[STEP 6] Adding service principal 'Tokity ALM Service Principal ServOrg' to environment...
The script will create a service principal under your ServOrg's tenant and wait 2 minutes for it to finish. After this, you will be prompted to enterYto continue.[STEP 7] Assigning delegated permissions (Azure DevOps and Dynamics CRM)...
The script will connect to MS Graph and delegate permissions as needed. After this, you will be prompted to enterYto continue.[STEP 8] Summary of environment provisioning
Assuming everything has worked up to this point, this will show you a summary of the provisioned environment. You can now move on to validating your ServOrg deployment.
ServOrg Deployment Validation
- In your tenant's Power Platform Admin Center, an environment has been correctly provisioned for the ServOrg:
<Your Base Name> Tokity ServOrg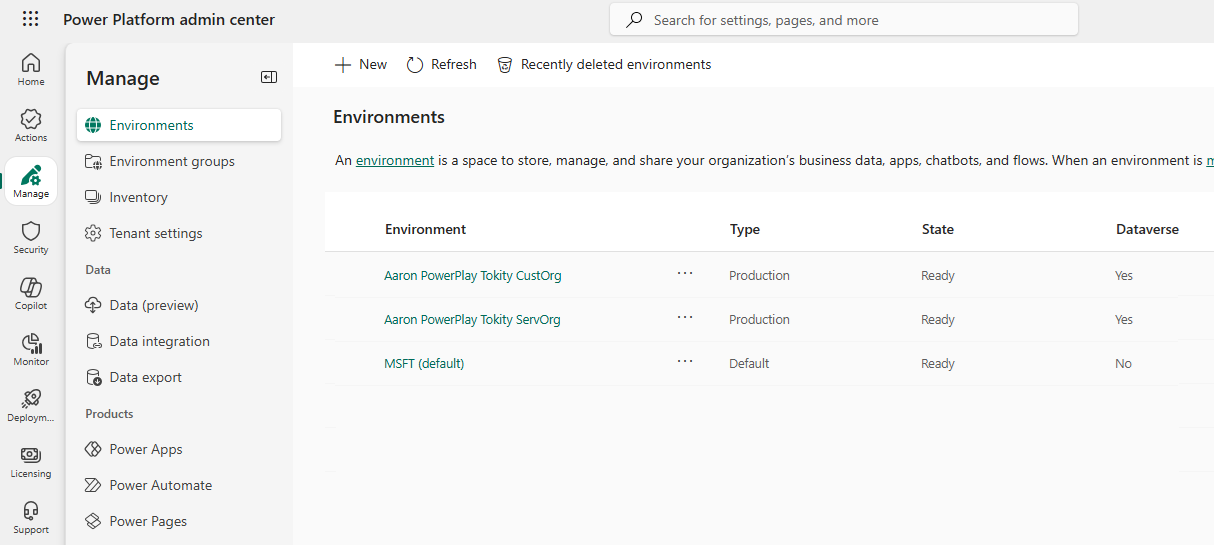
- In your Azure Portal, an Enterprise Application has been made for ServOrg service principal:
Tokity ALM Service Principal ServOrg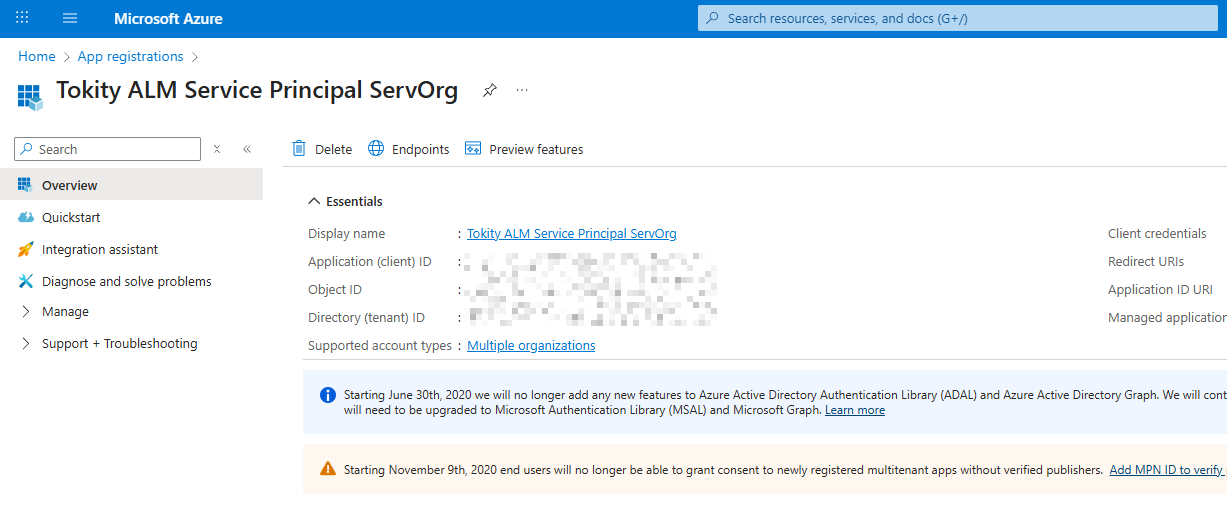
CustOrg Deployment
You can deploy CustOrgs for all your customers who wish to make use of the PowerPlay offerings, however we recommend deploying the ServOrg and CustOrg environments into your tenant initially to validate before deploying en masse.
Provision a CustOrg using PowerShell
- From your local machine in an administrator PowerShell prompt:
- Change directory to the location of the downloaded PowerShell scripts, if you are following the naming scheme advised, these will be under
C:\PowerPlaycd C:\PowerPlay
- Prepare the execution command with supporting parameters:
- IsTest set to $false
- EnvironmentType set to "Production"
& '.\<Your Base Name> Tokity CustOrg Power Play Environment Provisioning Script.ps1' -IsTest $false -EnvironmentType "Production"
- If you would like to perform a test deployment as a developer environment, you can set the
IsTestparameter to$trueand set theEnvironmentTypeparameter to"Developer"or"Sandbox".
- Execute the Tokity CustOrg Power Play Environment Provisioning Script:
PS C:\Windows\System32> cd C:\PowerPlay
PS C:\Windows\System32> Unblock-File -Path '.\<Your Base Name> Tokity CustOrg Power Play Environment Provisioning Script.ps1'
PS C:\Windows\System32> & '.\<Your Base Name> Tokity CustOrg Power Play Environment Provisioning Script.ps1' -IsTest $false -EnvironmentType "Production" - Use
Unblock-Fileas required if you receive error messages related to Execution Policy
- Change directory to the location of the downloaded PowerShell scripts, if you are following the naming scheme advised, these will be under
- Follow the on-screen prompts for the script:
[STEP 1] Validating prerequisites...
The script will automatically check whether everything is ready to proceed, then move on to the next step.[STEP 2] Resetting PAC CLI authentication...
Any previously cached logins for MS Graph will be removed. Press enter, and you will be prompted to sign in with the admin account for the CustOrg's Microsoft 365 tenant.[STEP 3] Creating Power Platform environment '<basename> Tokity CustOrg'...
The script will automatically create the a Power Platform environment and then move on to the next step.[STEP 4] Retrieving environment ID...
It will confirm the environment is retrievable and grab the environment ID. You will be prompted to enterYto continue.[STEP 5] Authenticating to environment '<basename> Tokity CustOrg'...
The script will pause for 3 minutes while it waits for Dataverse to finish provisioning, after which, you will be prompted to again, sign in again with the admin account for the CustOrg's tenancy. Once this is done, you will be prompted to enterYto continue.Authentication may fail because Dataverse was unable to provision quickly. Don't worry, it will re-prompt you again after 2 minutes.[STEP 6] Adding service principal 'Tokity ALM Service Principal CustOrg' to environment...
The script will create a service principal under your CustOrg's tenant and wait 2 minutes for it to finish. After this, you will be prompted to enterYto continue.[STEP 7] Assigning delegated permissions (Azure DevOps and Dynamics CRM)...
The script will connect to MS Graph and delegate permissions as needed. After this, you will be prompted to enterYto continue.[STEP 8] Assigning Power Automate delegated permissions to 'IECB Permissions' App...
The script will automatically assign the correct delegated permissions to the ICEB Permissions app. After this, you will be prompted to enterYto continue.[STEP 9] Summary of environment provisioning
Assuming everything has worked up to this point, this will show you a summary of the provisioned environment. You can now move on to validating your CustOrg deployment.
CustOrg Deployment Validation
Environment > Settings > Users/Permissions.- In your tenant's Power Platform Admin Center, an environment has been correctly provisioned for the CustOrg:
<Your Base Name> Tokity CustOrg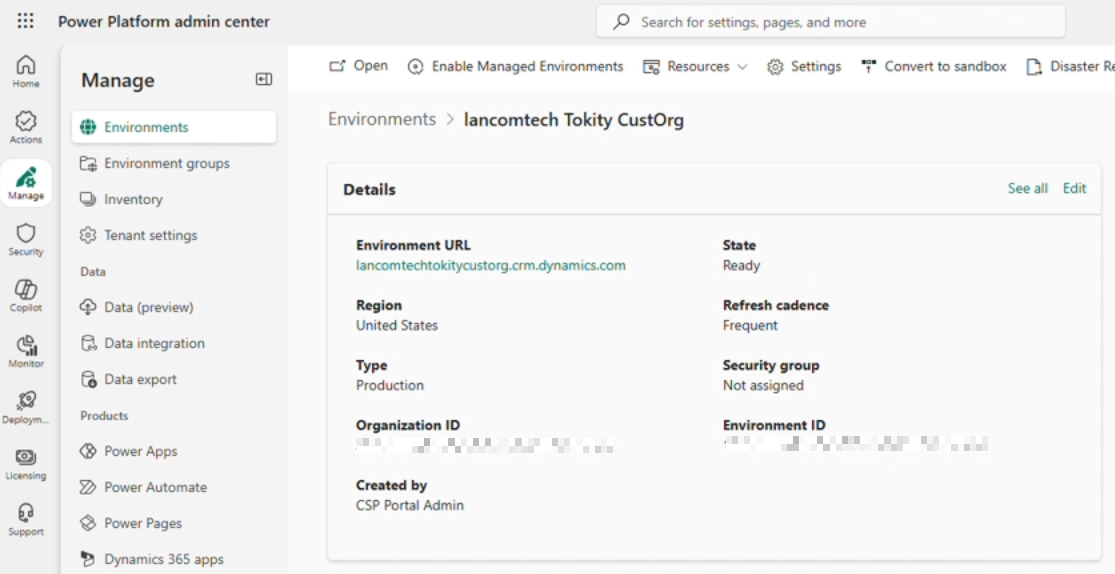
- In your client's Azure Portal, an Enterprise Application has been made for ServOrg service principal:
Tokity ALM Service Principal CustOrg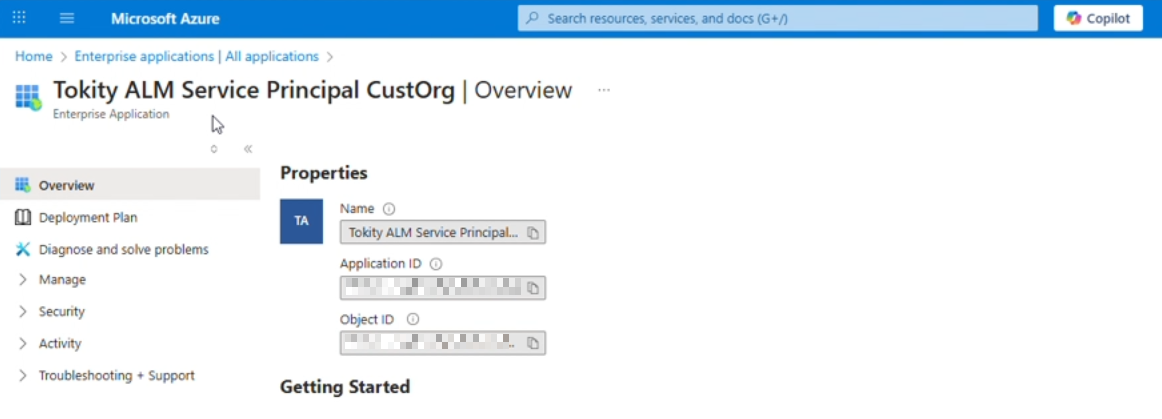
- In your client's Azure Portal, an Enterprise Application has been made for IECB Permissions:
IECB Permissions
Command Broker Registration
Now that we have provisioned our environments, we need to register our CustOrg environment with the Command Broker.
- To get started, open your DeskDirector Admin Portal and head to
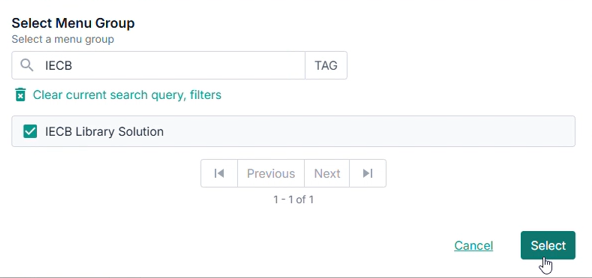
Integrations>Solution Library>Managed Solutions - Select the
IECB Library Solution, make sure you're on the latest version, then select Deploy
- Head to
Client Portal>Contacts, and then search and select the Onboarding Administrator contact used for your CustOrg environment provisioning - From the
Custom Portal Menumenu, assign theIECB Library Solutionmenu group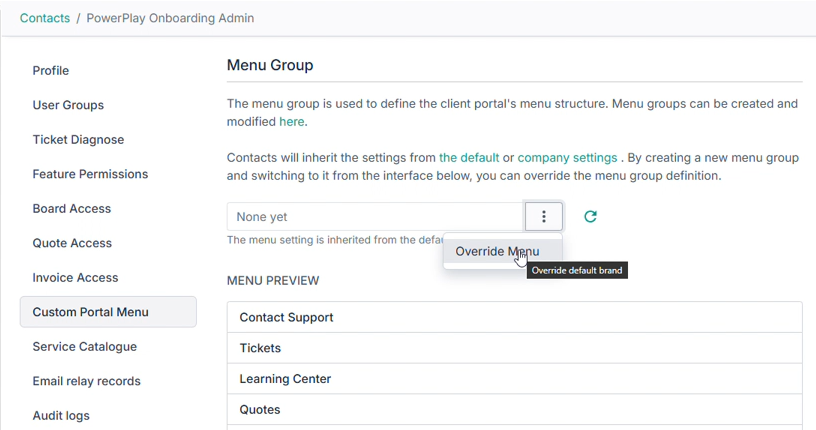
- From the
Profilemenu, Impersonate the contact usingDiagnose Client portal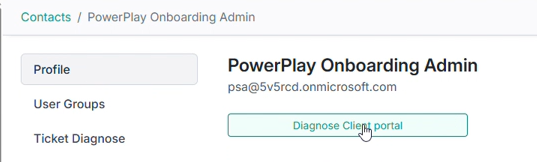
- In the Client Portal menu on the left-hand side, open the Command Broker Manager
- Click Register

- Navigate back to the Command Broker Manager page and take note of the two registration items shown so we can share these later:
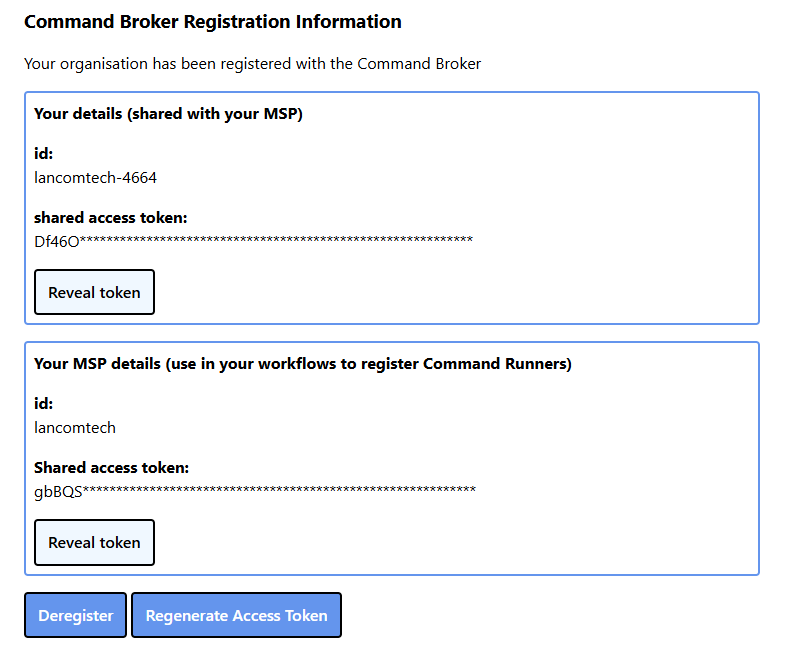
- Your details:
id - Your details:
Shared access token - Your MSP details:
id - Your MSP details:
Shared access token
- Your details:
Secure Form Submission
As part of completing our PowerShell scripts earlier, two provisioning summary text files would have been output in the same directory that your scripts are in: Provision Summary_YYYYMMDD_HHMMSS.txt
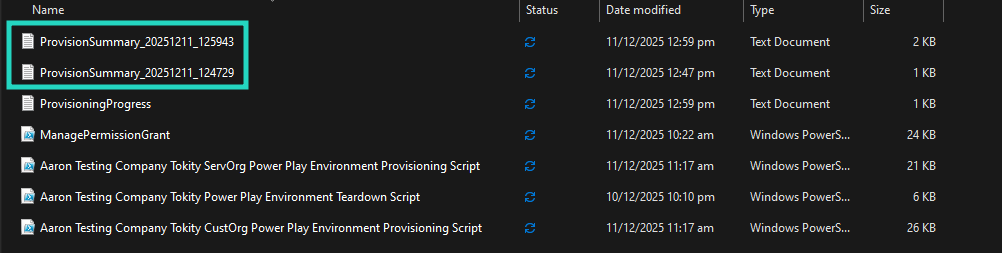
Please find both of these and then follow the steps below:
- Log into the DeskDirector Support Portal.
- In your I want to provision... ticket, access the attached Supplementary Form:
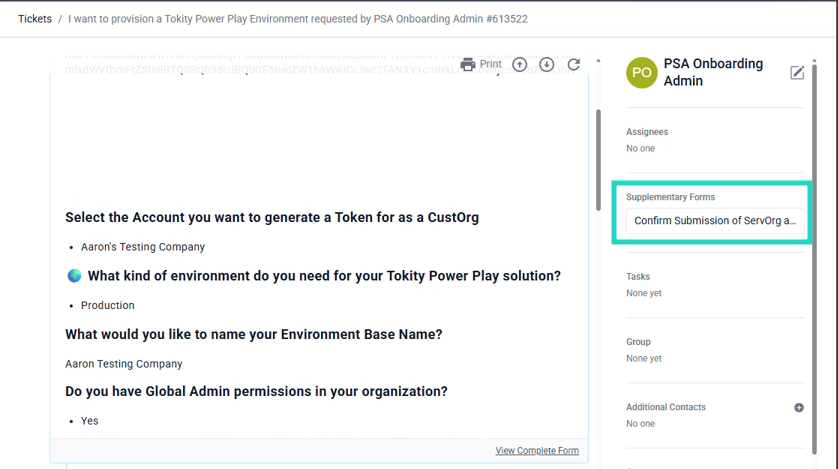
- The Supplementary Form will contain a hyperlink to a Secured Form:
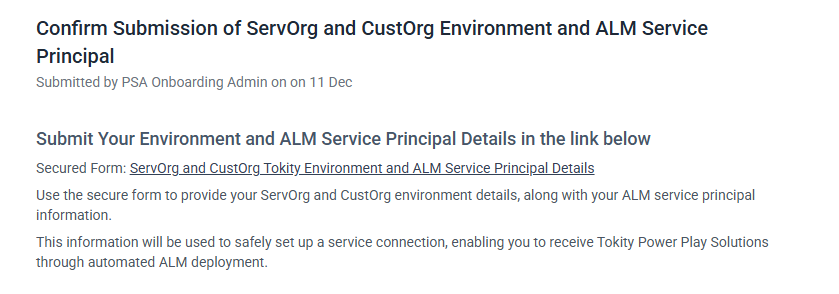
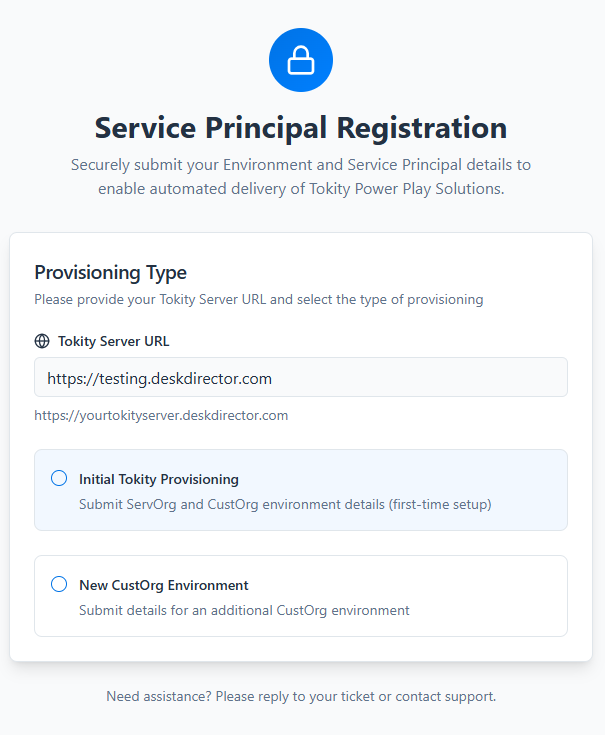
- Open the Secured Form link and fill in the required fields to complete the initial provisioning of your environments:
- Server URL: Your DeskDirector Server URL prefaced with
https://- Example:
https://testing.deskdirector.com
- Example:
- Select Initial Tokity Provisioning
- Your ServOrg details are available from one of the two
Provision Summary.txt file output:
- Environment URL
- Tenant ID
- Application ID
- Client Secret
- Client Secret Expiration Date
- Your CustOrg details are available from one of the two
Provision Summary.txt file output: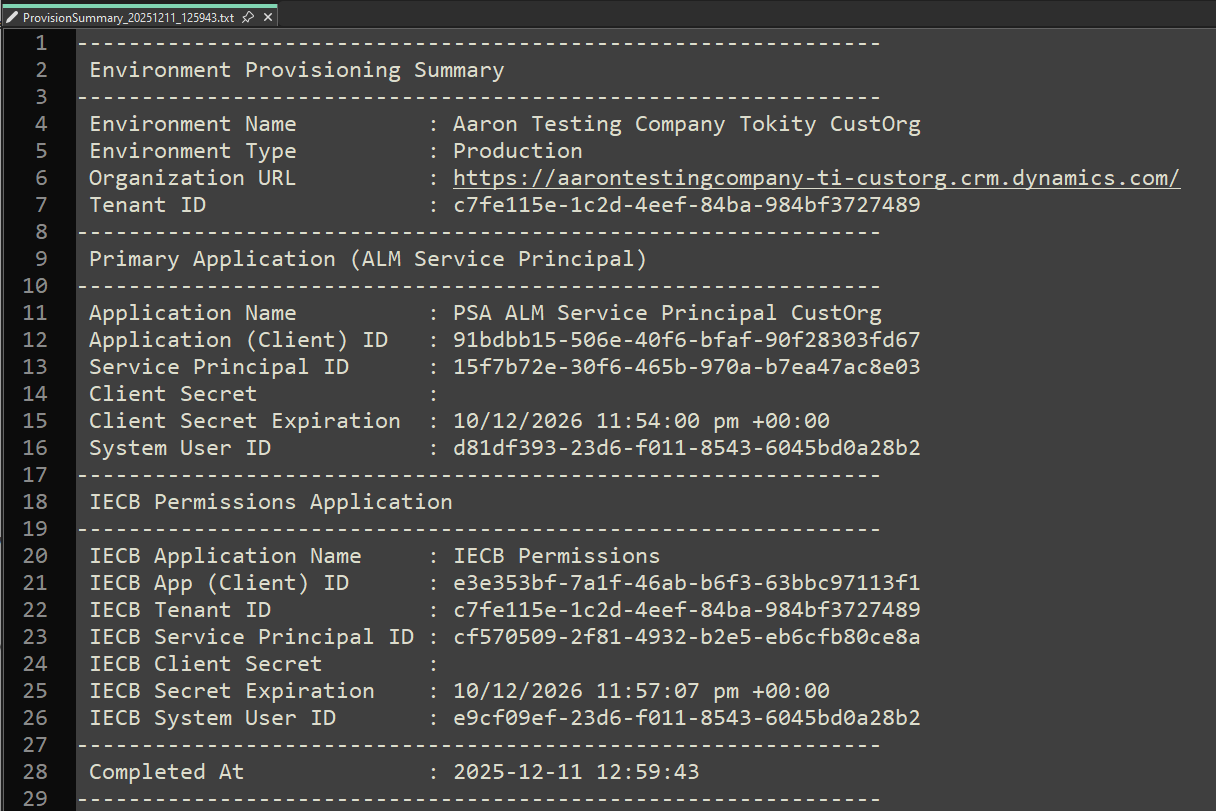
- Environment Name
- Environment URL
- Tenant ID
- From the ALM Service Principal heading:
- Application ID
- Client Secret
- Client Secret Expiration Date
- Server URL: Your DeskDirector Server URL prefaced with
- After completing the required fields, proceed by selecting Submit Securely

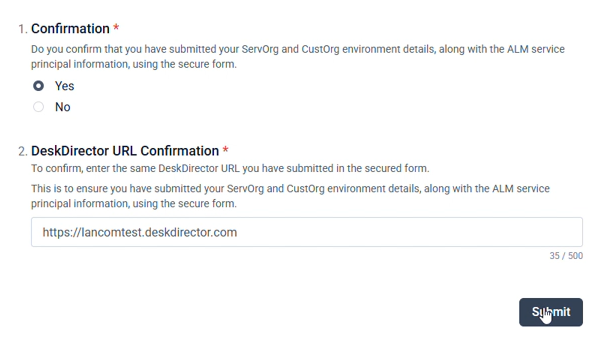
- Return to the Supplementary Form:
- Confirmation: Yes
- DeskDirector URL Confirmation: Your DeskDirector Server URL prefaced with
https://- Example:
https://testing.deskdirector.com
- Example:
- Select Submit
- Submit the form, and then your Tokity Environment and ALM Service Principal registration and deployment will begin automatically:
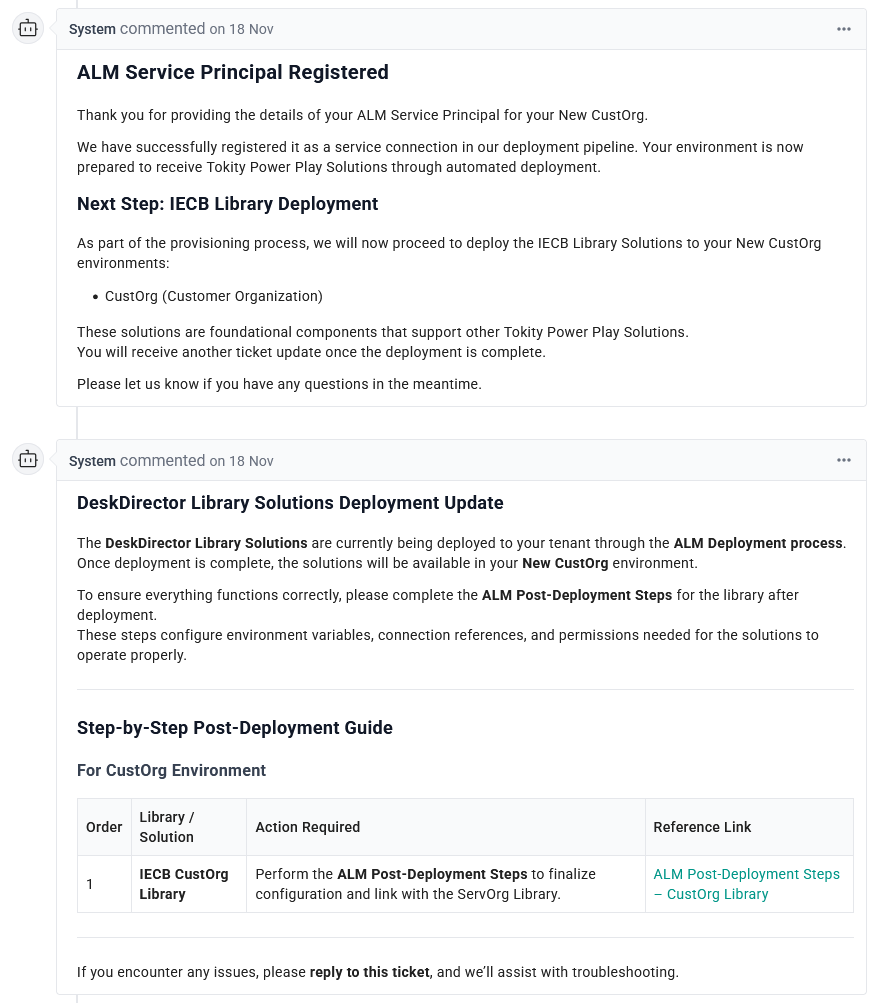
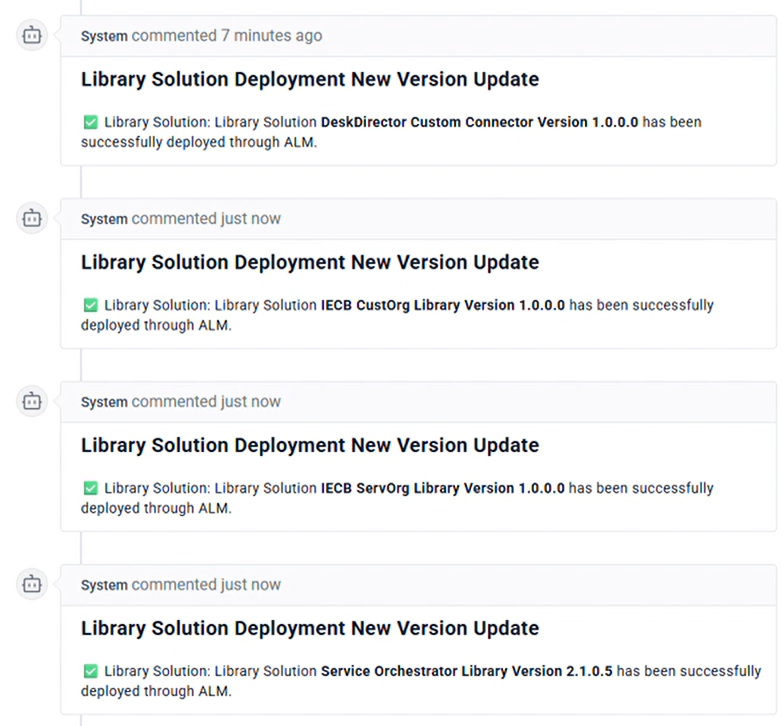
- After a short wait, you will receive the following solution deployment confirmation messages:
Next Steps
With the referenced solution deployments complete, you can move on to PowerPlay Post-Deployment Steps
Frequently Asked Questions
"I'm unable to run the provided scripts due to my execution policy."
Most customers will have some form of execution policy in place that prevents these scripts from running without being unblocked. Before you run each script, please unblock the script using the command shown below:
Unblock-File - Path `.\<Your Script Name>.ps1`
"Why am I getting licensing errors when I try to run the deployment scripts?"
This is most likely because you are missing a license either for your ServOrg or CustOrg. You will see errors that look something along the lines of: Workflow license is not available.
To resolve this, confirm that you have a Power Apps Premium License available in the tenant with your ServOrg and in any CustOrg tenants you are deploying to.
If you are receiving a licensing error in the [DDCommand] Create a user in Entra flow, this is most likely because the Admin user you are using does not have access to a Microsoft Entra P2 or Microsoft Entra ID Governance license.
In all cases, please review the licensing requirements at the start of this article.
"I'm receiving authentication failures and re-authentication warnings when running the deployment scripts."
These are usually expected, and the script is designed to handle these automatically. You will usually see two types:
WARNING: Authentication failed. Dataverse might not be ready yet.Error: The value passed to '--environment' is invalid. No Dataverse organization was found matching the specified criteria
The script will automatically re-attempt authentication or, in the second example, will wait longer for Dataverse to finish setting up. If the scripts crash completely, please reach out to the DeskDirector support team for further assistance.
"Why am I getting 502 errors when trying to re-deploy this solution?"
This is usually related to conflicts with the previous solution deployment. If you have previously deployed a ServOrg or CustOrg that you are trying to overwrite, please delete the previous ServOrg or CustOrg before continuing.
"What does the downloaded PowerShell script perform?"
The following table gives an overview of the commands within the ServOrg provisioning script:
Area | Operation (Human Description) | Command(s) in Script | Required Permission/Role |
PAC authentication | Create a new PAC auth profile by signing into Power Platform / Dataverse as the service account. This is the identity all later PAC commands will use. |
| Power Platform Administrator |
PAC authentication | Select the newly created PAC auth profile so it becomes the active context for subsequent PAC commands. |
| Power Platform Administrator |
Create a new Dataverse environment |
| Creating environments is an admin action, covered by Power Platform Administrator | Power Platform Administrator |
Environment discovery | List all environments in the tenant and find the ID + URL of the one just created. |
| Power Platform Administrator |
Environment auth | Create a PAC auth profile scoped specifically to the new environment so further PAC operations target that environment. |
| Power Platform Administrator |
Service principal creation (Tokity ALM app) | Register a new Microsoft Entra application + service principal and add it as a Dataverse System Administrator user in this environment. Outputs TenantId, AppId, Service Principal Id, Client Secret, etc. |
|
|
Graph connection | Connect to Microsoft Graph with delegated permissions so we can read and update the Tokity ALM app registration. |
| At the tenant level, the Microsoft Graph PowerShell enterprise app must already have admin consent for these scopes, granted by Cloud Application Administrator. At runtime, the signed-in service account just needs to successfully request these scopes. |
Graph locate app | Find the Tokity ALM app registration that was created earlier, using its display name. |
| Covered by delegated This allows the user to read/manage app registrations in the directory. No extra directory role beyond the existing consent. |
Graph update app registration | Update the app registration so it requests these delegated permissions and is configured as multi-tenant: 1) Azure DevOps API ( |
| Requires delegated |